Building a vacuum forming machine
July 29, 2011
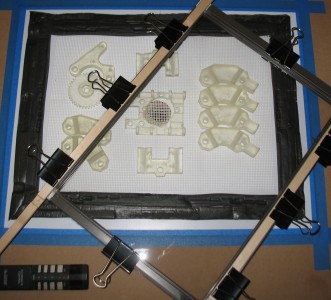
 [caption id="attachment_1380" align="alignleft" width="400" caption="The entire apparatus. The frame, which is on top, has a sheet of plastic in it. It's put in the oven (just like an oven shelf - the balsa wood on the top and bottom hooks into the ledges inside the oven). It will then be brought down on top of the parts you see in the picture, and air will be sucked through the hole in the middle of the plate."][/caption]
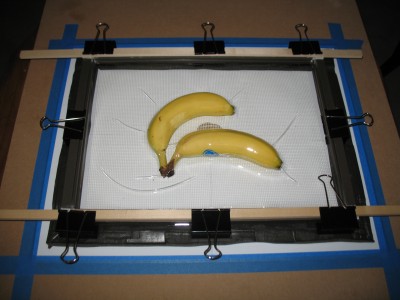
 [caption id="attachment_1383" align="alignleft" width="400" caption="Here you can see some hot plastic being molded over a couple of bananas. It's actually hard to notice because the plastic has conformed so well to their shape."][/caption]
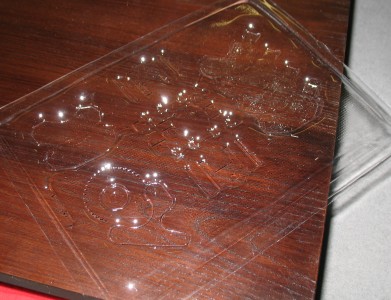
 [caption id="attachment_1382" align="alignleft" width="400" caption="You end up with a perfectly-molded plastic tray..."][/caption]
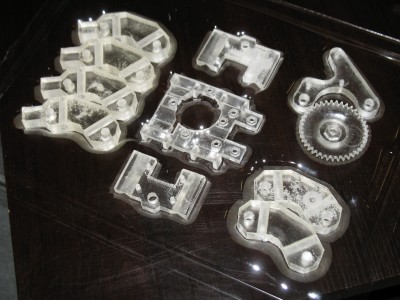
 [caption id="attachment_1381" align="alignleft" width="400" caption="...which can serve as packaging for what you molded."][/caption]
The first time I ever ordered a set of RepRap parts, they came in a plastic bag. I was a little surprised, since part of the appeal of the RepRap is that it’s high technology, no? I also think that getting the packaging and design right will be a major part of earning RepRap (and DIY 3D printing) more widespread acceptance - something which companies like Makerbot are working on now, though I don’t totally agree with their design direction.
So when I sold my own RepRap parts, I decided to look for a way to make the packaging a little nicer. Ideally, I wanted the parts to come in some kind of molded plastic packaging, so that they look like a complete, professional set that’s inviting to use. An example of the effect I wanted was a tray of chocolates - how when you get a box from Godiva, each piece has its own predetermined place. There’s something about the packaging that unifies the customer experience.
After some research, I learned that this type of packaging is made by “vacuum forming”. To vacuum form, you start with a wooden plate with some holes in the bottom. You put your object on top of that, and a heated, flexible plastic sheet on top of that. By sucking the air out through the holes in the wooden plate, the plastic sheet is sucked down and ends up becoming a perfect mold for your object or set of objects. Once the plastic cools, you’ve got a shaped piece of plastic that is fairly durable and conforms to whatever you were molding.
The basic concept has lots of applications, from plastic packaging (the plastic trays that chocolates sometimes come in), to hobbyists manufacturing cheap plastic objects such as RC car chassis, to props, to masks - you could even make your own ice cube trays this way, if the plastic holds up in the freezer. There are a few different plastics you can use, by the way; the one I prefer is called PETG, and is used in soft drink bottles.
The next question was how I’d actually get vacuum forming done. I mean, a machine to professionally mold plastic would cost thousands of dollars, right? Thanks to the magic of Instructables, I found that I could build one for about $100 in materials.
The basic concept is that you hook your _vacuum cleaner _up to a piece of fiberboard with a hole in it. The vacuum cleaner will then suck the air through the board. On top of the board, you do what I described above - put your object on the board, and put your hot plastic over the object. Most vacuum cleaners are powerful enough to pull the plastic tightly around whatever object you’re molding.
There are a few additional steps to ensure good airflow around your object, and minimal gaps through which air can be sucked in from the surrounding environment.
One is to use weatherstripping as a sealant. This is really smart, and while weatherstripping isn’t made to handle the melting temperature of the plastic, it holds up well enough. Another is to put a nozzle on the board you’re using, around which the vacuum cleaner hose goes. This makes sure that there’s a tight seal between the vacuum cleaner and the hole through which the air will be sucked. There are quite a few other additions as well, which in the end give a fairly good product, especially for the price.
I made some changes, too. Here are Justin’s addenda to the Instructables vacuum former instructions.
The instructions call for you to “put some things in the oven which we can support the plastic-holding frames on”, because the plastic will droop in the oven as it melts. Instead of doing this, we clamped some long pieces of balsa wood on top of the frames. This allowed our frame to rest on the already existing shelf holders in the oven.
The instructions call for “aluminum 3⁄8” or 7⁄16” windowscreen frame material that goes with… aluminum frame corners”. I found that 5⁄16” windowscreen material was much easier to obtain, and worked fine. I also used plastic frame corners with no (apparent) problems.
The ingredients say that “Some aluminum window screen material is also nice to have, but optional.” This is so that the plastic doesn’t get sucked into the airflow hole, thus blocking it and preventing the vacuum cleaner from doing its job. We found this was necessary, and we were able to use embroidery backing, which may be cheaper. You can get this at most craft stores.