A Ulam (prime number spiral) quilt
April 30, 2012
 [caption id="attachment_1986" align="alignleft" width="300" caption="The completed quilt, it's about 60" on each side."][/caption]
More than other fiber arts, quilting depends on understanding the geometry of how the pieces of a quilt will fit together in complex ways. That is to say, it’s math! Justin, my husband (then boyfriend) told me about the Ulam spiral and I thought it’d be a pretty cool subject for a quilt for this reason. Doubly so since the Ulam spiral is also known as the “Ulam cloth”!
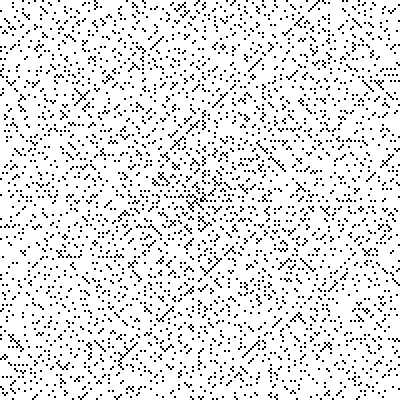
(In case you’re not familiar with it, and don’t feel like clicking through, the Ulam spiral is a grid where each square represents an integer, starting with 1 at the center and moving out in a spiral pattern. When the number is prime, the square is black; when it’s not, the square is white.)
I started by constructing a map of the quilt on graph paper. I chose a 41 x 41 grid for the following reasons:
The Ulam Spiral has one central square representing the number one, which I wanted to be in the dead center of my quilt, so I had to choose a grid with odd dimensions.
I wanted the resulting quilt to be about 60” square, which is a good wall-hanging size. Using 2” strips would result in 1.5” squares (an 0.25” seam allowance on all sides is typical), and 41 x 1.5” is about 60”.
Had Justin known how to code at the time, he probably could have generated this graph for me. Oh well. I ended up coloring in all of the prime numbers from 2 to 1,681 by hand. Yes, really. The paper just needed to be big enough for me to see the squares.
|
|
|
The Ulam spiral actually shares this property with a specific, common type of quilt called an Irish chain quilt. If you look at any Irish chain quilt, you’ll see that no two squares of the same color touch each other. Irish chain quilts are made using strips of fabric that are sewn together, and then cut up, and I could do that here:
I cut 2” strips of black fabric and white fabric, making them as long as possible.
I sewed a white strip to a white strip to make the white + white block, and
I’d sew a black strip to a white to make the white + black strip block.
In addition to saving time, the Irish chain quilt method has the advantage of being much more precise since you don’t have to measure and cut each individual square.
|
|
|

Then, I sewed the foursquares together and so on until I had done an entire quadrant. I didn’t have any special method to avoid errors, but after a few years nobody’s found any mistakes yet!
|
|
|
That’s it. Once I had all the quadrants done and sewn together, I laid down a backing, batting on top of that, and the quilt face-up on top. I used temporary basting stitches to hold the quilt together while I quilted the permanent stitches that keep the quilt together today; I chose to quilt around only the prime numbers, so the quilt is actually weaker where there are fewer prime numbers. But from the back you can “read” the Ulam Spiral clockwise! Lastly, I bound the quilt in black.